Pulser Pump Model
This model is easy to make and you can develop skills with the heat
gun , soldering iron, and acrylic plastic when making it. Always work
in a well ventilated area when using plastics and glue.
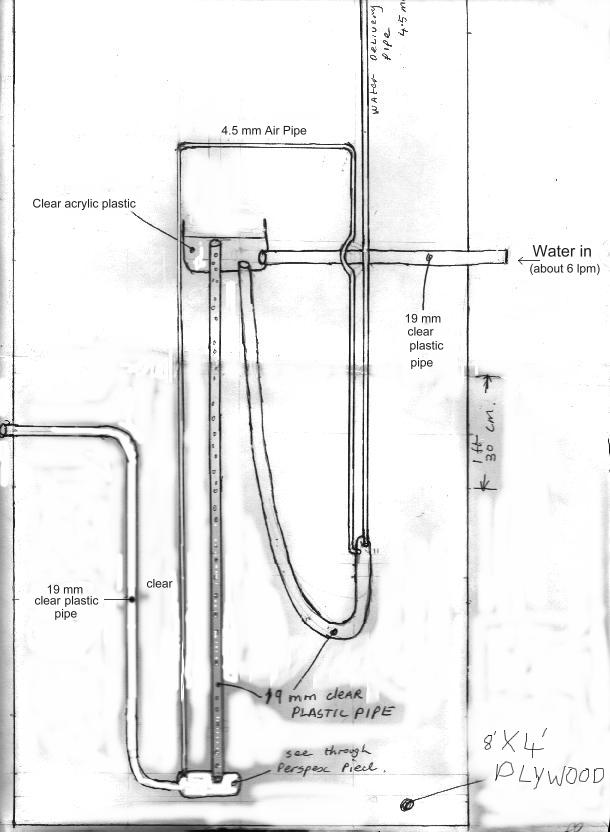
The model is of a split process pump.
You can make a simpler model if you leave out the walking stick shaped
19 mm pipe, hole c in the top container and the water
delivery pipe and just extend the air pipe straight up. The simpler model
is quite useful for demonstration and easier to build.
Equipment list Drill, soldering iron, measuring
tape, hacksaw and a clamp.
Materials list 2 pieces of acrylic plastic about
360 mm by 360 mm, some pieces of wood
12 ft (3m) of 19 mm clear plastic pipe 5m of 4.5 mm clear plastic pipe,
a piece of 1/2 in (13 mm) copper pipe, a wall or some 8 by 4 plywood to
set it up, some nails, some glue (either silicone sealant, or pipe cement).
We include a larger (more legible and printable) copy of this
at the end of this page. Some respondents had trouble with the 4.5 mm air
pipe so perhaps it is better to use 6 mm tubing for this pipe in your model.
Pulser Pump Model
The diagram below shows the bottom piece of acrylic plastic
cut and ready for bending. The holes should be drilled or punched to about
1/2 inch diameter. To punch, use a piece of 1/2 inch (13 mm) copper
pipe. heat the preps and the end of the pipe and you can simply push it
through the soft acrylic. (Do it on a piece of wood. Punching is much better
than drilling because acrylic plastic is brittle. The small hole is drilled
or burned through with a nail. (3 or 4 mm diameter.)
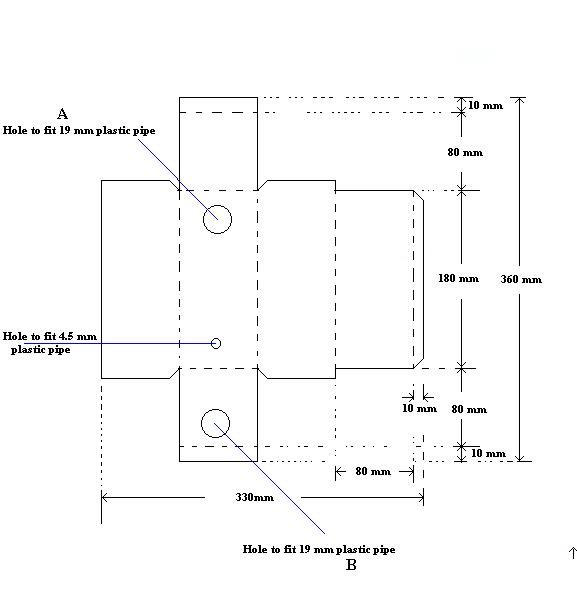
The 4 vertical dotted lines are for heating and bending. The acrylic
plastic is clamped along the line, heat is applied slowly to both surfaces
close to the line and it is bent when malleable enough.
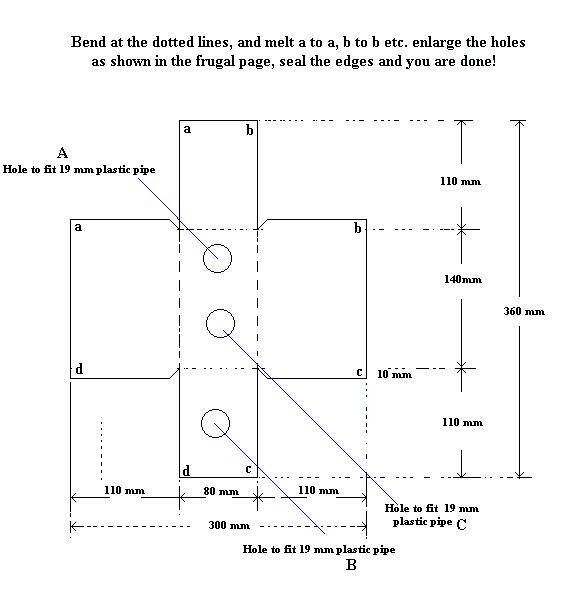
When these 4 are bent at 90 degrees, you have a a box shape with a
small lap and open at both ends. Next, weld the lap down at both ends with
the soldering iron. It only needs a short dab to keep it together. Next,
the lid and bottom of the box are bent down and the 2 welds are done on
each end. Next use the techniques described on the frugal
page to fit the plastic pipes to the acrylic container. When this is
done, it is time to seal all around the edges with the silicone bonding
material or with plastic pipe cement.
Email
Page Contents
Home
page
Pulser
index page
The top container
Now, you are all ready to join up the pipes and hopefully all is fitting
tightly. I have found that a plastic cola bottle is ideal to join the 19mm
pipe to the two 4.5 mm pipes. Cut off at the neck, the cola bottle fits
tightly over the 19 mm pipe (with a little help from the heat gun) drill
2 small holes in the bottle top, fit the two 4.5 mm pipes tighten the lid
on and you have a good joint.
This model can work poorly at the start because no fall back occurs.
(The pipe surface is greasy and repels water). To counteract this, place
a 30 cm long piece of thin wire in the bottom of the air pipe and in the
water delivery pipe. (The water falls back beside the wire). Later
on, as the pipes get a bit dirty, there is no problem!
I hope all goes well as you make the model. Do not despair if
it takes time to learn the techniques.
email me about any problems.
Pulser Pump Model